As attention spans waned and scrolling finally stopped, YouTube Shorts have proven to be among the strongest forces for conveying bite-sized information. One kind of content that tends to perform well on the platform? Tutorials. Brevity and utility-packed tutorials are chock-full of value, with each tutorial-driven short offering an impetus to view—and an impetus to return.
Whether you’re a creator who produces technology hacks, makeup hacks, cooking hacks, or design hacks, one thing is for sure: the more efficient your video and video rhythm, the greater it will perform. And that is where CapCut Desktop Video Editor comes in — an easy-to-use, free, but feature-rich editing tool for any creator. Integrated features such as text to speech enable you to instantly create narrations or directions without needing to manually record voice-overs.
In this article, we will walk you through making tutorial-style YouTube Shorts using CapCut Desktop Video Editor in 5 simple steps, with some more tips to get your videos noticed.
Table of Contents
ToggleWhy Use CapCut for Tutorial Shorts?
CapCut became so popular with its mobile application, but the desktop editor is even more feature-rich, especially for those intending to make professional-quality educational material.
Here’s why it suits shorts so perfectly:
- Optimized for vertical video editing (9:16)
- Easy drag-and-drop interface
- Integrated text, transitions, effects, and voiceovers
- Free to use — no watermark or paywall on key features
- Perfect for creators who need to trim, finesse, and publish in an instant
Now, let’s break down the whole process of making tutorial shorts, from source footage to the final upload. You can even combine it with an AI video generator to automatically generate initial drafts or concept videos, saving you time before you refine them in CapCut.
Step 1: Plan Your Tutorial and Prepare Your Footage
It is worth taking a few minutes beforehand to plan out what you’re going to be showing. Begin by asking yourself: What am I solving for, or what tip am I giving? Can I communicate this in under 60 seconds? What does the viewer need to see, step-by-step, to clearly get the message? Whether you’re recording a screen tutorial, a hands-on demo, or talking directly into the camera, your content needs to have a simple yet effective format.
Once you’ve recorded your video or screen recording, collect any supporting items you’ll use, including text overlays, icons, voiceovers, background music, and logos, to enrich the viewing experience and make your message more relatable.
Step 2: Begin Your Project on CapCut Desktop
Now that your content is ready, it’s time to set up your project in CapCut. First, open CapCut Desktop Video Editor and click “New Project.” This launches a fresh timeline where you’ll build your Short. Second, set the aspect ratio to 9:16. YouTube Shorts are vertical by default, so click the aspect ratio settings and select 9:16 for mobile-optimized viewing.
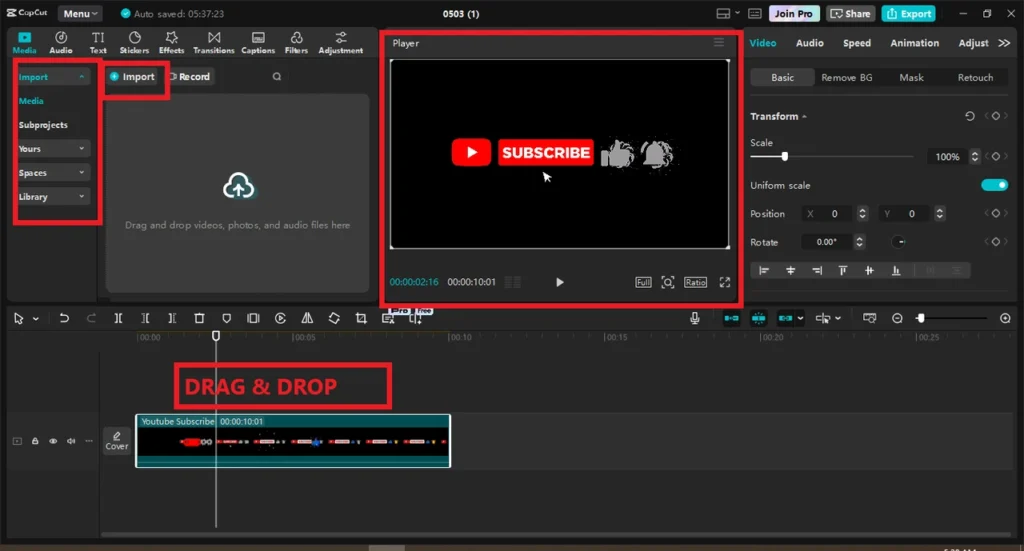
Third, drag your recorded video clips, screenshots, or B-roll into the left panel’s media library. Fourth, drag your clips to the timeline at the bottom to add media. Place them in the sequence of your tutorial steps, and quickly trim, split, or reposition clips by right-clicking or dragging edges.
Step 3: Edit and Organize Your Tutorial
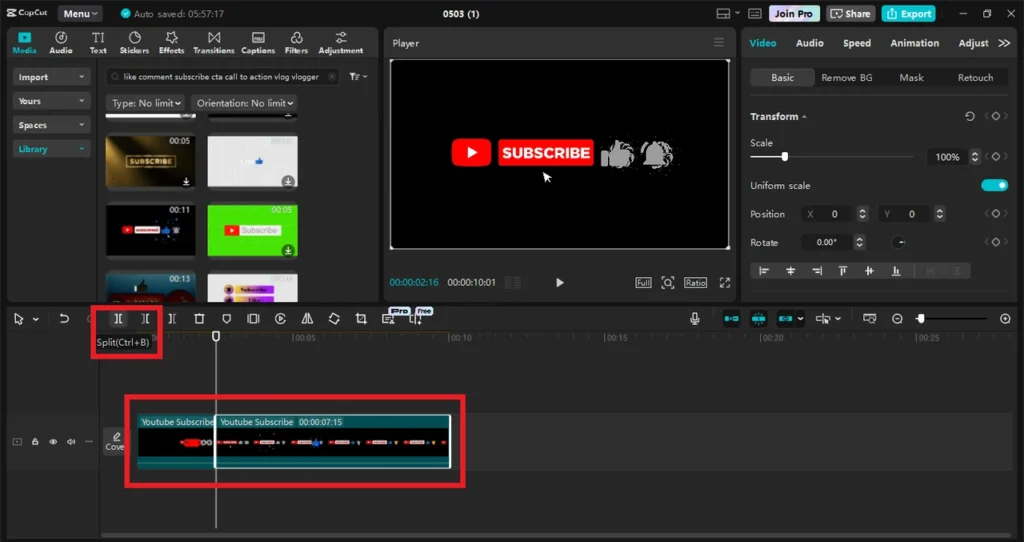
Now that your clips are in the timeline, it’s time to assemble them into a tight, punchy narrative. Begin by editing the fluff—cut out pauses, filler words, or stumbles with the split tool (Ctrl + B). In short, seconds matter, so try to make things snappy. Then, structure the steps so that your tutorial makes sense.
You can use title cards or overlays to introduce every step, add fast zoom-ins to emphasize key parts of the screen or product, and add short transitions, such as a rapid fade or swipe, for fluid movement between steps.
Want to experiment with tone? CapCut even offers a voice changer, allowing you to match the vibe of your video or simply add a fun twist to your narration.
Step 4: Add Text, Captions, and Visual Enhancements
This is where your tutorial breaks out of viewer-awkward and becomes viewer-friendly. Begin by inserting on-screen directions by utilizing CapCut’s powerful text editor. Tap “Text” > “Add Text” and write out concise, easy-to-understand directions for each step. Make the font crisp and large enough for mobile users to read, and maintain readability through high-contrast colors, such as white text with dark shadow or background.
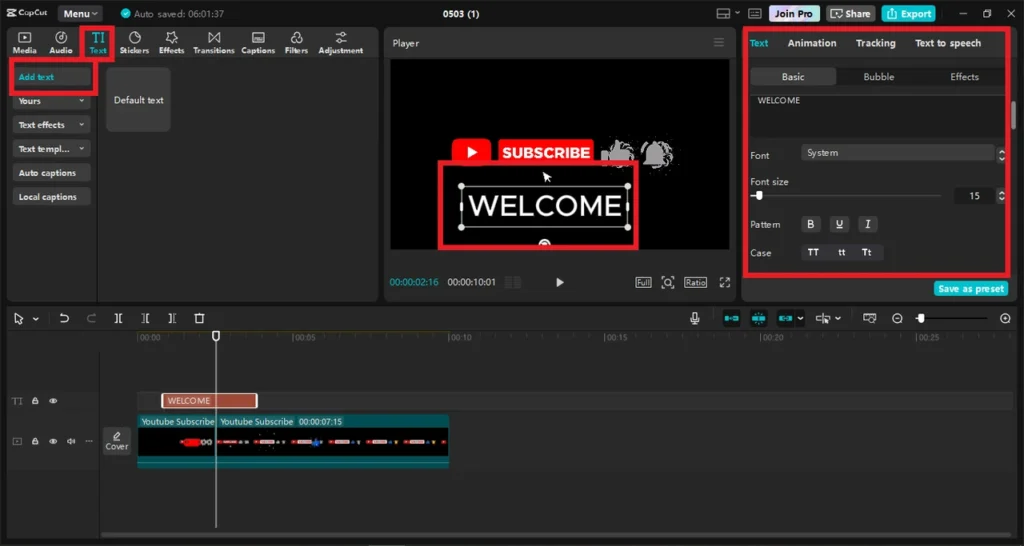
If you are speaking in the video, use auto-captions or subtitles. Go to “Text” > “Auto Captions,” choose your language and speaker type, and CapCut will create editable, format-friendly text. Captions come in handy, particularly when keeping viewers engaged without sound and enhancing accessibility.
Add stickers, icons, or arrows to further improve clarity. Visual elements such as these can help highlight key actions by pointing at UI buttons or drawing attention to important steps.
Step 5: Final Polish and Export
You’re almost done! Let’s get your Short ready to publish. First, watch your video from start to finish and check for spelling errors in text, awkward cuts or timing, and any audio sync issues. Next, add an end card or call to action—something as simple as a two-second text screen with “Subscribe for more tips” or “Give it a try and tag us” can provide valuable direction to your viewers.
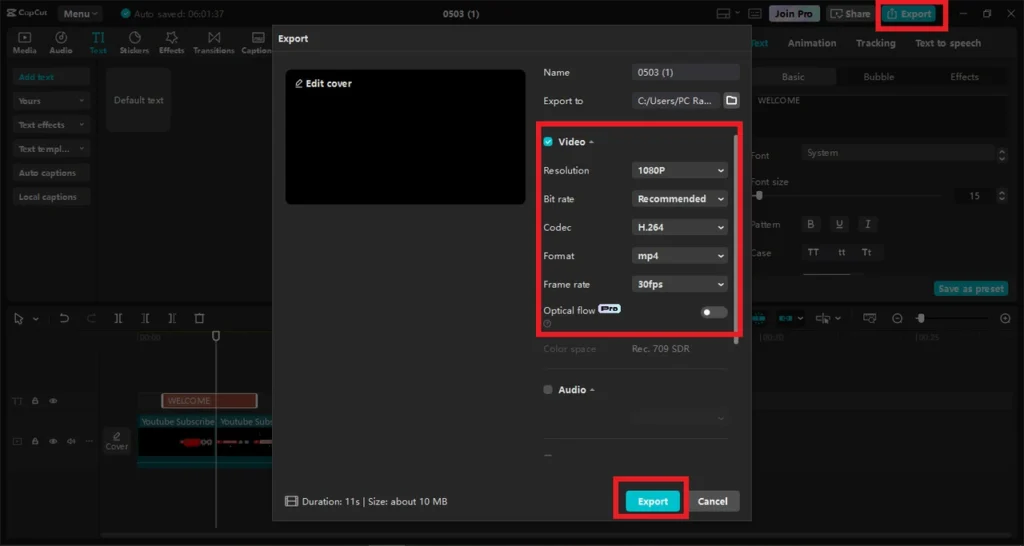
Then, click “Export” in the top right corner of CapCut. Set the resolution to 1080p, frame rate to 30fps, and format to MP4. Make sure to name your video something descriptive, like “How to Use the Clone Tool – 60sec Tutorial.” Finally, upload your video to YouTube as a Short. You can do this from your desktop or phone, but ensure that the video is less than 60 seconds, has a 9:16 aspect ratio, and has #Shorts in the title or description to make it more visible.
Final Thoughts
YouTube Shorts tutorials are an excellent way to share knowledge, grow your audience, and become an authority figure—all in one minute. With the right content, a good plan, and CapCut Desktop as your editor, you don’t need a studio setup or editing degree to begin.

